I recently began a major project using Babylon.js The reason I selected Babylon.js was the support for browser based game environment (at 60fps), and web-based VR (WebVR).
The first thing I wanted to do was load a 3D model that had been created in Blender. Here is how.
In this tutorial I’m going to quickly cover setting up your development environment and then demonstrate how to load a 3D model that was created in Blender (v.2.8). Make sure you export the final model as a glTF. I prefer the glb format over glTF as it incorporates the entire model, animation, and materials in one file rather than multiple files.
Once you have your model, you will need to decide where you will be testing your script from: a local server or a web server.
For faster iteration, I suggest setting up your development system with a local server. This is now much easier than in the past thanks to Python’s server tools.
To setup a local server, follow the directions on the Mozilla.org site: https://developer.mozilla.org/en-US/docs/Learn/Common_questions/set_up_a_local_testing_server
(Note: I found one error in the Windows directions: use ‘python -m http.server’ to launch your server instead of ‘python3’).
Of course, once you have a model loading, you will want to be able to share it with the rest of the world. I used AWS lightsail and launched a node.js instance to host my files.
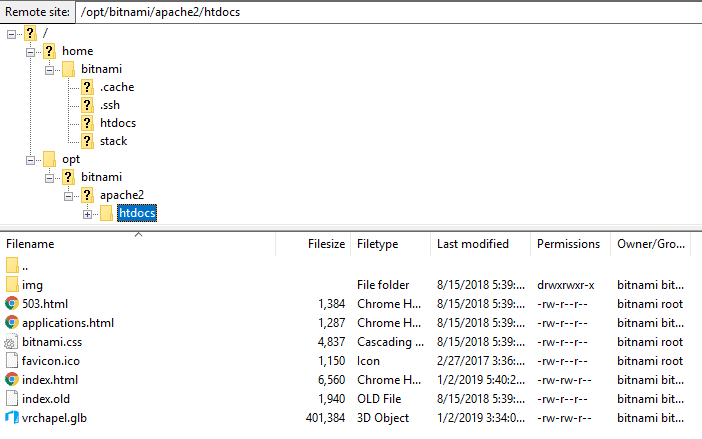
Using Filezilla, I was able to quickly upload the html and glb files to the server and share them with the world. The files are stored in the /opt/bitnami/apache2/htdocs folder
Babylon.js can be completely encapsulated within the html document. For this tutorial, we are going to keep it as simple as possible and keep the html and script in the index.html file, only loading the glb file.
The html code is straight forward, loading the babylon framework and the gltf loaders. After the scripts are loaded, we can set the style for the document and the render canvas:
<!DOCTYPE html>
<html>
    <head>
        <meta http-equiv="Content-Type" content="text/html; charset=utf-8" />

        <title>Sample using Babylon js</title>
        <script src="https://preview.babylonjs.com/gltf_validator.js"></script>
        <script src="https://preview.babylonjs.com/babylon.js"></script>
        <script src="https://preview.babylonjs.com/loaders/babylonjs.loaders.js"></script>
        <style>
            html, body {
                overflow: hidden;
                width: 100%;
                height: 100%;
                margin: 0;
                padding: 0;
            }

            #renderCanvas {
                width: 100%;
                height: 100%;
                touch-action: none;
            }
        </style>
    </head>
Now that we have the header taken care of, we can jump into the body. First we need to create a canvas and then create a function that will store the scene. Once the function is declared, we can setup the scene:
<body>
   <canvas id="renderCanvas"></canvas>
   <script>
      var canvas = document.getElementById("renderCanvas");

      var createScene = function() {
         // Create scene
         var scene = new BABYLON.Scene(engine);
Next we will setup the default environment, enabling shadows on the ground. We will also turn on the VR option, so that anyone who has VR googles can see the object in VR.
         // Default Environment
         var environment = scene.createDefaultEnvironment({ enableGroundShadow: true, groundYBias: 1 });

        // Enable VR
        var vrHelper = scene.createDefaultVRExperience({createDeviceOrientationCamera:false});
        vrHelper.enableTeleportation({floorMeshes: [environment.ground]});
Now let’s get to the fun part; loading the model!
We are going to use the BABYLON.SceneLoader.Append command to make this happen. This allows us to load add the model to an existing scene. We will also set the camera and lights so that we can see everything.
        var building = BABYLON.SceneLoader.Append("./", "VRChapel.glb", scene, function (meshes) {
            scene.createDefaultCameraOrLight(true, true, true);
            });
There is a lot happening with the Append command, so let’s break it down:
The 1st parameter – “./” – provides the location or folder of the file to be loaded. In this case the glb file is in the same folder.
The 2nd parameter “VRChapel.glb” the model to be loaded. If you saved your file as a glTF, only the model will be loaded, no textures, materials, or animations.
The 3rd parameter tells the engine where to load the model too, in this case the scene.
The 4th parameter is a function to create the camera and lights for the scene.
Finally, we return the scene and launch the engine. Notice the at the scene is describe before the engine is launched.
        return scene;
      };

      var engine = new BABYLON.Engine(canvas, true, { preserveDrawingBuffer: true, stencil: true });
      var scene = createScene();
Finally, we add a rendering loop, handle window resizing, and close the html page:
        engine.runRenderLoop(function () {
            if (scene) {
                scene.render();
            }
        });

        // Resize
        window.addEventListener("resize", function () {
            engine.resize();
        });
    </script>
</body>
</html>
And there you have the minimum code to load a 3D model in Babylon.JS.
Of course, there is SO much more that we can (and will) do with this environment. This is just the starting point.
Special thanks to Adrianna Mott for the model! You can see the results of this tutorial online at: http://vrchapel.me/Tutorial1-loadModel.html
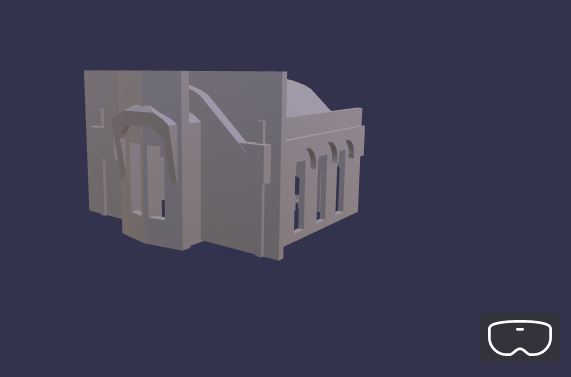
The only problem at this point is the skybox which is a little small and located inside the building. We will address that in the next tutorial.