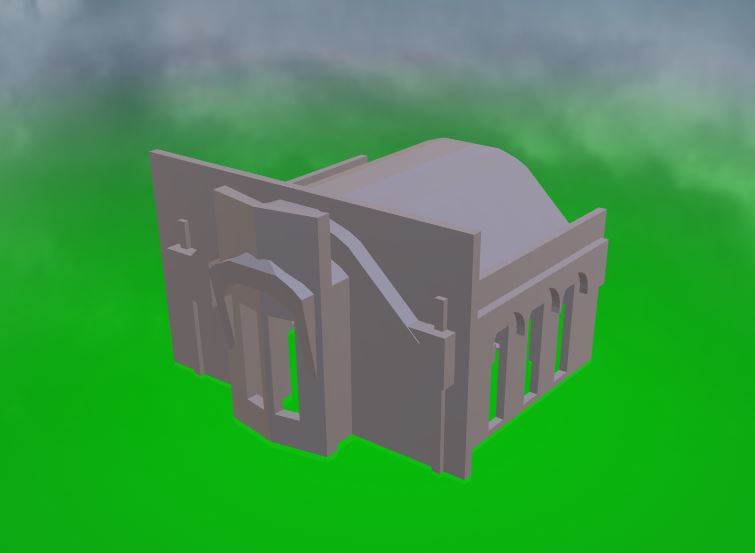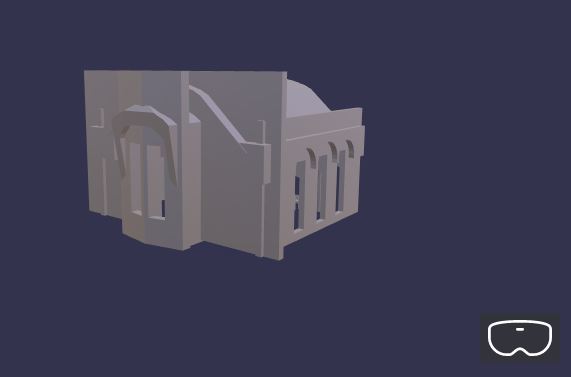
In our last tutorial on Babylon.JS, we loaded a 3D model into a basic environment. But we had a problem with the skybox and ground settings (you can see the results here). Here was the final code from last time:
<!DOCTYPE html>
<html>
    <head>
        <meta http-equiv="Content-Type" content="text/html; charset=utf-8" />

        <title>Sample 1 using Babylon js</title>

        <!-- Babylon.js -->
        <script src="https://preview.babylonjs.com/gltf_validator.js"></script>
        <script src="https://preview.babylonjs.com/babylon.js"></script>
        <script src="https://preview.babylonjs.com/loaders/babylonjs.loaders.js"></script>

        <style>
            html, body {
                overflow: hidden;
                width: 100%;
                height: 100%;
                margin: 0;
                padding: 0;
            }

            #renderCanvas {width: 100%; height: 100%;
                touch-action: none; }
        </style>
    </head>
<body>
    <canvas id="renderCanvas"></canvas>
    <script>
        var canvas = document.getElementById("renderCanvas");

        var createScene = function() {
            // Create scene
        	var scene = new BABYLON.Scene(engine);

            // Default Environment
            var environment = scene.createDefaultEnvironment({ enableGroundShadow: true, groundYBias: 1 });

            // Enable VR
            var vrHelper = scene.createDefaultVRExperience({createDeviceOrientationCamera:false});
            vrHelper.enableTeleportation({floorMeshes: [environment.ground]});

            var building = BABYLON.SceneLoader.Append("./", "vrchapel.glb", scene, function (meshes) {
                scene.createDefaultCameraOrLight(true, true, true);
            });
        	return scene;
        };

        var engine = new BABYLON.Engine(canvas, true, { preserveDrawingBuffer: true, stencil: true });
        var scene = createScene();

        engine.runRenderLoop(function () {
            if (scene) {
                scene.render();
            }
        });

        // Resize
        window.addEventListener("resize", function () {
            engine.resize();
        });
    </script>
</body>
</html>

Let’s get those environment options adjusted so that they are not so distracting.
All of the environmental options can be adjusted at the time of creating the scene.createDefaultEnvironment. The only section that we need to adjust is the var environment = scene.createDefaultEnvironment({
section in the code above.
First, by default, the skybox is on. To adjust the skybox, we can add a couple of environment options:
            var environment =  scene.createDefaultEnvironment({
                    createSkybox: true,
                    skyboxSize: 150,
                    skyboxColor: BABYLON.Color3.Teal(),
                    enableGroundShadow: true,
                    groundYBias: 1
            });
In this code snippet, I have added the
                createSkybox: true,
                skyboxSize: 150,
                skyboxColor: BABYLON.Color3.Teal(),
code. The createSkybox: true, is redundant, but is nice to have if you want to be obvious in your code. To remove the skybox, change the true to false.
The skybox is by default a size of 20. With the second option, I have increased it’s size to 150.
The last line allows us to change the skybox color to teal.
Note that capitalization does matter!
Let’s do a similar process for the ground:
                    createGround: true,
                    groundSize: 200,
                    groundColor: BABYLON.Color3.Green(),
By default, the ground is also on with a default size of 15.
To remove the ground, you can change the true to false.
There is a lot more we can do with the skybox and ground, but this will get us started for the next phase of our development.
You can see the the current look of our environment here: http://vrchapel.me/Tutorial2-skyboxandground.html
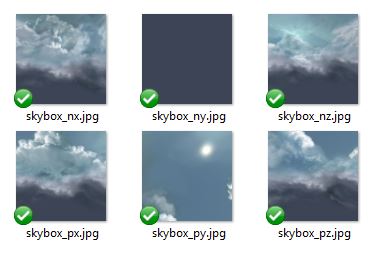
Now that we have a basic skybox and ground, let’s improve the skybox to make it a bit more realistic. Basic skyboxes are composed of 6 images, one for each face of a cube. Babylon uses a naming convention of the name of the image then _ab, the a representing positive or negative (p or n), and the b representing the x, y, or z coordinate. Thus, you get file names like skybox_nx.jpg to for the negative X image. You can download these and other skybox images from the babylonjs github repository. They are located in /playground/textures folder. https://github.com/BabylonJS/Babylon.js. I placed the textures in a new folder named “textures” in the same folder as my index.html file.

Time to load our new skybox. First, change the createSkybox in environment to false and comment out the associated options for the skybox:
            var environment =  scene.createDefaultEnvironment({
                    createSkybox: false,
//                  skyboxSize: 150,
//                  skyboxColor: BABYLON.Color3.Teal(),
Next, we will create a variable to hold the skybox images. This is done by creating a new babylon standard material of the type “skybox” for our scene. We will set back face culling to false and then load the textures. The rest of the associated code is setting the coordinates (so that the images are laid out correctly), and setting the diffuse and specular colors to black:
    var skyMaterial = new BABYLON.StandardMaterial("skybox", scene);
        skyMaterial.backFaceCulling = false;
        skyMaterial.reflectionTexture = new BABYLON.CubeTexture("textures/skybox", scene);
        skyMaterial.reflectionTexture.coordinatesMode = BABYLON.Texture.SKYBOX_MODE;
        skyMaterial.diffuseColor = new BABYLON.Color3(0, 0, 0);
        skyMaterial.specularColor = new BABYLON.Color3(0, 0, 0);
Finally, we create the skybox with a create box command and set the material of the box to the skyMaterial variable that we just created.
    var skybox = BABYLON.MeshBuilder.CreateBox("skyBox", {size:1000.0}, scene);
        skybox.material = skyMaterial;
And now you have a skybox! The only problem is that the camera starts on the outside of the skybox instead of inside, looking at our building. We will correct that in the next tutorial. For now, you can use your middle mouse button to zoom inside of the cube.
Here is the final version of this tutorial and it’s associated code: http://vrchapel.me/Tutorial2b-skyboxandground.html

<!DOCTYPE html>
<html>
    <head>
        <meta http-equiv="Content-Type" content="text/html; charset=utf-8" />

        <title>Sample using Babylon js</title>

        <!-- Babylon.js -->
        <script src="https://preview.babylonjs.com/gltf_validator.js"></script>
        <script src="https://preview.babylonjs.com/babylon.js"></script>
        <script src="https://preview.babylonjs.com/loaders/babylonjs.loaders.js"></script>

        <style>
         html, body { overflow: hidden; width: 100%; height: 100%; margin: 0; padding: 0; }

         #renderCanvas { width: 100%; height: 100%; touch-action: none; }
        </style>
    </head>
<body>
    <canvas id="renderCanvas"></canvas>
    <script>
        var canvas = document.getElementById("renderCanvas");

        var createScene = function() {
            // Create scene
        	var scene = new BABYLON.Scene(engine);
            // Default Environment
            var environment =  scene.createDefaultEnvironment({
                    createSkybox: false,
//                    skyboxSize: 150,
//                    skyboxColor: BABYLON.Color3.Teal(),
                    createGround: true,
                    groundSize: 1000,
                    groundColor: BABYLON.Color3.Green(),
                    enableGroundShadow: true,
                    groundYBias: 1
            });

            var skyMaterial = new BABYLON.StandardMaterial("skybox", scene);
                skyMaterial.backFaceCulling = false;
                skyMaterial.reflectionTexture = new BABYLON.CubeTexture("textures/skybox", scene);
                skyMaterial.reflectionTexture.coordinatesMode = BABYLON.Texture.SKYBOX_MODE;
                skyMaterial.diffuseColor = new BABYLON.Color3(0, 0, 0);
                skyMaterial.specularColor = new BABYLON.Color3(0, 0, 0);
            var skybox = BABYLON.MeshBuilder.CreateBox("skyBox", {size:1000.0}, scene);
               skybox.material = skyMaterial;

            // Enable VR
            var vrHelper = scene.createDefaultVRExperience({createDeviceOrientationCamera:false});
            vrHelper.enableTeleportation({floorMeshes: [environment.ground]});

            var building = BABYLON.SceneLoader.Append("./", "vrchapel.glb", scene, function (meshes) {
                scene.createDefaultCameraOrLight(true, true, true);

            });
        	return scene;
        };

        var engine = new BABYLON.Engine(canvas, true, { preserveDrawingBuffer: true, stencil: true });
        var scene = createScene();

        engine.runRenderLoop(function () {
            if (scene) {
                scene.render();
            }
        });

        // Resize
        window.addEventListener("resize", function () {
            engine.resize();
        });
    </script>
</body>
</html>